Elevate Meals with 10-Minute Candied Walnuts: The Stovetop Secret to Instant Gourmet
Imagine transforming ordinary dishes into extraordinary culinary experiences with just a handful of ingredients and ten minutes of your time. This isn't a kitchen fantasy; it's the reality of creating perfectly sweet, a little salty, and irresistibly crunchy homemade candied walnuts. Forget complicated oven methods or long waits – this incredible
10 minute candied walnuts recipe harnesses the power of your stovetop for a shortcut to instant gourmet goodness. Whether you're aiming to elevate a simple salad, enhance a charcuterie board, or simply crave a delightful, ready-to-grab snack, these stovetop candied walnuts are your ultimate secret weapon.
We all appreciate a touch of indulgence, but often time is our most precious commodity. That's precisely why this recipe is a game-changer. By skipping the lengthy baking times typically associated with candied nuts, we unlock a world of convenience without compromising on flavor or texture. The result? A perfectly caramelized, crunchy coating that will have everyone asking for your secret. Prepare to impress, delight, and enjoy the simplest path to truly irresistible candied walnuts.
The Stovetop Shortcut: Why This 10-Minute Candied Walnuts Recipe Shines
When it comes to making candied nuts, many traditional methods involve a low and slow roast in the oven, often with an egg white coating. While delicious, these approaches demand more time and attention. Our preferred method for this
10 minute candied walnuts recipe takes a different, far quicker route: the stovetop. This technique is not just a shortcut; it's a revelation for its speed and simplicity.
*
Instant Gratification: In a mere 10 minutes, you can go from raw walnuts to glistening, crunchy perfection. This makes them ideal for last-minute meal additions or unexpected snack cravings.
*
Energy Efficiency: Heating up a large oven for a small batch of nuts can feel wasteful. The stovetop method uses less energy and keeps your kitchen cooler, especially during warmer months.
*
Hands-On Control: Cooking on the stovetop allows for continuous monitoring and stirring, giving you direct control over the caramelization process. This helps prevent burning and ensures an even, consistent candy coating. It’s an approachable recipe, even if you’re a newbie in the kitchen.
*
Superior Flavor: We’ve tested various sugars and found that maple syrup truly takes the cake for its rich, nuanced sweetness that complements walnuts beautifully, creating a flavor profile that's arguably even better than many oven-roasted versions.
This stovetop secret isn't just about speed; it's about achieving an equally, if not more, delicious result with unparalleled ease.
Unlocking Flavor: The Simple Ingredients You'll Need
One of the most appealing aspects of this
easy candied walnuts recipe is its minimalist ingredient list. You only need four simple components, most of which you likely already have in your pantry, to create this incredible sweet and savory snack.
*
Walnuts: The star of the show! For the best results, use raw (unroasted, unsalted) walnuts. This allows you to control the seasoning and ensures the walnuts absorb the candy coating perfectly. While walnuts are our focus, this method is also fantastic for pecans or cashews if you fancy a switch.
*
Butter: Essential for developing that rich, buttery caramel flavor we all adore in candied nuts. It provides the necessary fat for the coating to adhere and crisp up beautifully. For a vegan alternative, coconut oil works wonderfully and will still create a luscious, crunchy coating.
*
Maple Syrup: Our sweetener of choice, and for good reason! Pure maple syrup offers a depth of flavor that white or brown sugar often can't match, creating a sophisticated and naturally sweet coating. Its natural caramel notes enhance the walnuts without being cloyingly sweet. You can substitute with honey or molasses if preferred, though the flavor profile will shift slightly.
*
Sea Salt: A crucial ingredient that acts as a flavor enhancer. A generous sprinkle of coarse sea salt perfectly balances the sweetness of the maple syrup, creating that addictive sweet and salty crunch that makes these candied walnuts irresistible. Don't skip it!
Crafting Perfection: Your Step-by-Step 10-Minute Candied Walnuts Recipe
Making these
quick candied walnuts is incredibly straightforward. Follow these steps for perfect results every time:
1.
Melt the Fat: Begin by melting your butter (or coconut oil) in a large non-stick skillet over medium heat. A larger skillet ensures the walnuts have enough space to cook evenly without overcrowding.
2.
Add Sweetness and Salt: Once the butter is melted and slightly bubbling, stir in the maple syrup and sea salt. Continue to cook for about 1 minute, allowing the mixture to warm through and combine.
3.
Introduce the Walnuts: Add the raw walnuts to the skillet. Ensure they are spread in a single layer as much as possible.
4.
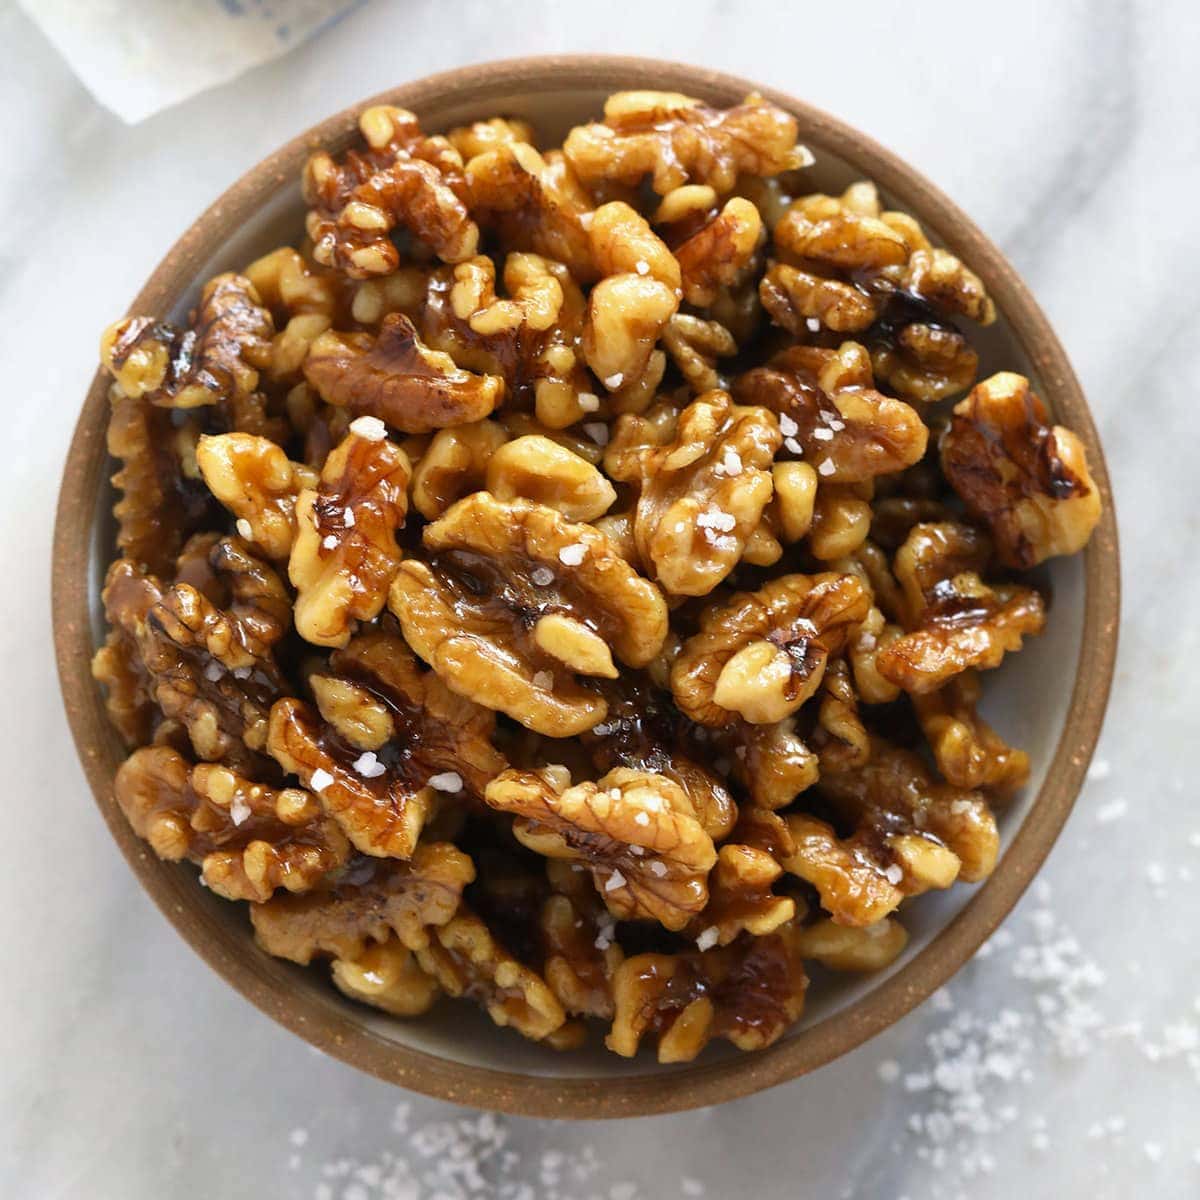
Stir Constantly: This is the most crucial step for achieving that perfect candy coating. Stir the walnuts continuously for approximately 5-7 minutes. You'll notice the syrup mixture beginning to bubble, thicken, and coat the nuts. As it cooks, the liquid will evaporate, leaving a beautiful, sticky glaze that will eventually crystallize. Keep stirring until the walnuts are evenly coated, shiny, and the syrup has mostly absorbed or caramelized onto them. They should appear dry and lightly toasted.
5.
Cool and Crisp: Immediately transfer the candied walnuts from the skillet onto a piece of parchment paper or a silicone baking mat spread on a baking sheet. Using a spatula, quickly spread them out in a single layer to prevent them from sticking together as they cool. This also helps them crisp up beautifully.
6.
Enjoy: Allow the candied walnuts to cool completely, which typically takes about 10-15 minutes. As they cool, they will become wonderfully crunchy. Once cool, break apart any clumps, and they're ready to enjoy!
Beyond the Basics: Creative Twists & Smart Substitutions
While the classic
10 minute candied walnuts recipe is fantastic on its own, there's always room for personalization. Here are a few creative ways to put your own twist on these delicious nuts:
*
Spice It Up: Before adding the walnuts to the skillet, stir a pinch of ground cinnamon, nutmeg, or a pumpkin pie spice blend into the maple syrup mixture. This adds a warm, aromatic depth perfect for autumn or holiday flavors.
*
Add Some Heat: For those who enjoy a little kick, a tiny pinch of cayenne pepper added alongside the salt can create a delightful sweet and spicy contrast.
*
Alternative Nuts: As mentioned, this method works beautifully with other raw nuts. Try it with pecans for "candied pecans" or cashews for a different texture and flavor profile.
*
Vegan Friendly: Easily make these candied walnuts vegan by substituting butter with an equal amount of coconut oil. Just keep an eye on them as they cook, as coconut oil can sometimes lead to slightly quicker caramelization.
*
Different Sweeteners: While maple syrup is our top recommendation, you can experiment with honey or molasses for distinct flavor variations. Honey will yield a lighter, floral sweetness, while molasses will provide a deeper, richer, almost treacly note.
Expert Tips for Flawless Candied Walnuts
To ensure your
stovetop candied walnuts turn out perfectly every time, keep these expert tips in mind:
*
Don't Overcrowd the Skillet: If making a double batch, ensure your skillet is large enough to hold all the nuts in a relatively single layer. If not, it's better to make two individual batches. These nuts candy so quickly that making two batches takes no time at all compared to an oven method.
*
Constant Stirring is Key: This prevents burning and ensures every walnut gets coated evenly. Don't walk away from the stove!
*
Medium Heat: Avoid high heat, which can burn the syrup before the nuts are properly coated. Medium heat allows for controlled caramelization.
*
Cooling is Crucial: Spreading the walnuts quickly and thinly on parchment paper is vital for them to crisp up individually and prevent them from becoming one giant clump.
*
No Soaking Required: Save yourself the extra step! Raw walnuts go directly into the skillet, no pre-soaking is necessary.
*
Storage Savvy: Once completely cool, transfer your candied walnuts to an airtight container. Store them in a cool, dark place for up to 1 week to maintain their crunch.
*
Freezing for Future Enjoyment: You can easily freeze batches of candied walnuts for longer storage. After they've cooled completely to room temperature, transfer them to a freezer-safe container or bag. They'll keep in the freezer for up to 3 months. When you're ready to enjoy, you can use them right from the freezer – they thaw quickly. Some even enjoy them directly from the freezer as a delightful, icy snack!
Elevate Every Dish: Inspiring Serving Suggestions
The versatility of these
easy 4-ingredient candied walnuts is truly remarkable. They can transform a simple meal into something special or be enjoyed as a standalone treat.
*
Gourmet Salad Topper: This is arguably one of the most popular uses. Sprinkle them generously over your favorite greens, fruit salads, or grain bowls for an irresistible crunch and burst of flavor. They pair wonderfully with creamy cheeses, crisp apples, and vinaigrette dressings. If you're looking for more quick and easy candied nut ideas, explore our guide on
Minute Stovetop Candied Walnuts: Quick & Easy Recipe.
*
Charcuterie Board Enhancement: Add a bowl of candied walnuts to your next cheese and charcuterie spread. Their sweet and salty notes beautifully complement savory meats and cheeses.
*
Breakfast Booster: Sprinkle them over oatmeal, yogurt, granola, or even pancakes and waffles for an extra layer of texture and sweetness.
*
Dessert Delight: Use them as a topping for ice cream, puddings, pies, or as a garnish for baked goods like muffins and brownies.
*
Snack Attack: Grab a handful straight from the container for a quick, satisfying, and energizing snack.
*
Homemade Gifts: Package them in pretty jars with a ribbon for a thoughtful, homemade gift that's sure to be appreciated by friends, family, or colleagues. For another angle on creating that perfect sweet and salty crunch, check out our insights on
Easy 4-Ingredient Candied Walnuts: Sweet, Salty Crunch in 10 Mins.
In conclusion, this
10 minute candied walnuts recipe is more than just a quick snack; it's a testament to how simple ingredients and a clever technique can yield extraordinary results. With minimal effort, you can create a versatile, delicious, and undeniably gourmet addition to countless dishes. So go ahead, give these stovetop candied walnuts a try, and discover just how easy it is to elevate your meals and treat your taste buds!